The single most important ingredient in any website build or any digital asset you produce is your process. A process is defined as procedure, proceeding apply to something that goes on or takes place. Everyone has their own unique process that they’ve developed through a combination previous experiences, both good and bad, and education.
My process begins with a very simple task:
1. Listen
First, sit down with your client and make a personal connection with them. They’ve never worked with you before and need to understand how you think and operate in order to trust you along the way. In my experience, you can save yourself a ton of time and headaches down the road by simply listening to your client’s issues and coming up with a tailored solution to their problems. Let’s face it, they’re not coming to you if everything is great for their business. Listen and understand why things aren’t working.
2. Strategize
After you have a really good handle on the exact problems you need to solve, the next thing you’ll need to determine is where the content for the site will be coming from. Will the business owners be writing it? In that case, develop a thorough questionnaire that pulls together the product and service offerings of the business and why they are different from any other business in their specific industry. Then, you’ll need to conduct market research. Find 3-5 “benchmark” sites in their industry that will serve as your guide along the way. Take notes. What’s working? What can be improved? Dribble is a great resource for inspiration.
3. Design
Once you have a good baseline of content to work with from your client and a good handle on what works in their particular industry, now it’s time to start designing.
Start with wireframes. Essentially all you’re doing here is sketching out basic shapes and text in order to determine what goes where in terms of text and image placement. “Call to actions” will drive the entire user interface of your new site. Visitors need to be show and told what you want them to do on your site. Each main section needs a call to action that answers the question “What do I do next?” I use Photoshop to map typically 3-5 top level pages on the site. Home, primary service page, secondary service page, team page, and contact page to name a few.
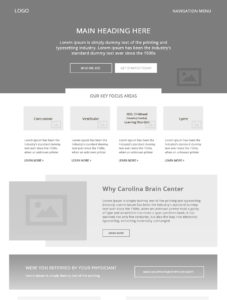
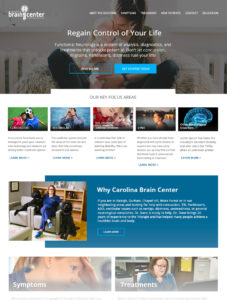
Once you have your wireframes in place, now it’s time to piece together mockups, that serve as the user experience for new site visitors. What will the navigation look like? What type of photos will you be using? What are your primary cta’s and user flow elements that guide users down an intended path to learn more about the business, buy a product, become a customer, or submit information for a consultation? You’ll need to have these elements in place before any building happens. Color, typography, movement and animation, each element has a role to play in getting visitors to perform desired actions on your website.
 4. Build
Take your mockups and begin to develop your site using your particular CMS (content management system) platform. I use Wordpress for each of my sites, and in particular, I build with Uncode, a completely customizable “endless” them that allows me to develop my wireframes pixel by pixel. After all, your website is a content engine. Wordpress is geared towards ongoing content injection over time to grow your site and attract visitors. If you are outsourcing to a developer, make sure to export each layer and asset of your mockups and compress them into a folder so your developer receiving them can work efficiently, and most importantly, build to the exact specifications of your interface designs and strategic user flow.
I’ve worked with developers of of all shapes and sizes. In my experience, the more detail oriented you can be in your asset naming, the better. If you’re developing the site yourself, make sure to consider the user experience on all major devices. “User empathy” is key in providing an experience that does not degrade, for example, from desktop to mobile. 60% of all site visitors (industries vary) come from mobile users. “Mobile-first” websites are not just for certain industries anymore, they are the norm.
5. Launch
Once your build is in place, using your client or questionnaire generated content, branding, contact forms, buttons, etc, now it’s time to test. View the site on your phone, laptop, desktop, and in all major browsers to make sure you’re covering all your bases. Act like a customer. Would you buy their products? Would you work with their company? Do you trust them? Be totslly honest here.
You’ll also need to configure any SEO/ Google Analytics tools on the site in order to monitor traffic sources, and most importantly, iterate in the future. No site is etched in stone. The key is to track time on site, bounce rate, traffic sources, keyword ranking, and site speed in order for search engines to properly index your client’s site and position their business for growth.
Once your client gives you the green light to launch, configure your domain, install your SSL certificate for increased security, and update your staging site urls to reflect “https” on each page.
A well diagnosed process goes along way in solving a client’s problems. Your process makes your job easier and keeps you efficient along the way with little wasted time and effort. You’ll be using your design “blueprint” (wireframes and mockups) as your guide to ensure your site operates smoothly. After launch, you’ll monitor traffic, help your client dominate their industry, and engage with their customers.